
Recently I’ve been talking with some people that are having some difficulties understanding Grids, and to achieve similar things they use other kinds of layout.
In this article, I’m going to explain step by step how to use a grid, why, and what you can achieve with it.
Let’s start with the basics
A grid is a layout type that allows you to create designs using Row/Columns.
Create a Grid is really simple you just have to:
1-Add the Tag ‘Grid’
XAML:
<Grid> </Grid>
C# CODE:
var grid = new Grid();
2-Add the size of each cell
To define the size, there are 3 ways to do it:
1.Absolute
It is a fixed size, so you can add any number to the Wight/Height parameter.

2.Auto
The Row/Column will adapt to the child size.
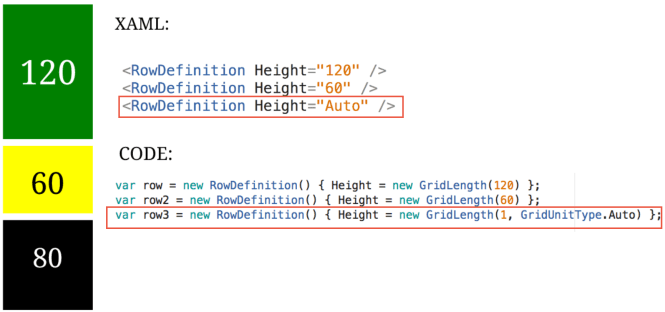
As you can see, the black box has a Height of 80, so the row takes that size.
3.Star
It expands proportionally to the space size.
So, for example, if you want to have different boxes that occupy a height of 50%, 20%, 30%, the code will be something like this:

Note: In XAML instead of 1* you can use just *
To add each row/column to the grid, we have two properties: Grid.RowDefinitions (To add rows) and Grid.ColumnDefinitions (To add columns), both are collections that receive a list of each Row and Column definition. Also, you can mix all the size type properties we saw before.

3-Add an element
To add an element to a box view you just have to specify in what Column and Row you want to place it, for example:
If we want to add the pink box view we saw in the image before and place it in the Column 0/Row 0:
XAML:
![]()
CODE:
![]()
To get the UI we saw before:

Other properties
Span

If you want your cell to occupy more than one row/column you can use the property Row.Span or Column.Span, and specify which cell you want to span.
For example, if you want to remove the green box and expand your pink box to the next column (Column 1), the code would look like:
XAML:
![]()
CODE:

Note: Check that instead of expanding until 1 we are expanding until 2. If you expand until 1 it won’t have any effect because the actual cell in the position 0 is expanded until 1 by default.
Spacing

If you want to have more spacing between Columns and Rows you can use the properties RowSpacing and ColumnSpacing.
![]()
Why use Grids
- Performance Improvement: Having a screen with a lot of layouts can make the rendering slower, so this is why sometimes you can see an app running slower. To improve it a better approach is to use a Grid because you will only have one layout with multiple children.
A good reference about it: https://michaelridland.com/xamarin/hacking-the-xamarin-forms-layout-system-for-fun-and-profit/
What else we can achieve using Grids
- Responsive UI

Code: https://gist.github.com/Char0394/9dfe3fb0beaa45fa2c80353e3b07f137
- Put an element over the other

Code: https://gist.github.com/Char0394/32800aca256f8b3b89d533010ad488df
- Tablet UI Effect
 Code: https://gist.github.com/Char0394/f2c7f5e8a83144ab26a8b3863f36a4bc
Good References
- https://developer.xamarin.com/guides/xamarin-forms/user-interface/layouts/grid/
- https://developer.xamarin.com/guides/xamarin-forms/creating-mobile-apps-xamarin-forms/summaries/chapter17/
That’s all for now.
Happy coding!


7 Comments
Love this Charlin! Good job compiling all this important information together!
Its is really helpful information. Keep up the good work. I really liked it. Thank you soo much
Thank you for clarifying the grid best possible to us. I really appreciate it.
Excelente! muy explicativo, muchas gracias por la aportacion, muy util! Sigue asi, Saludos desde Ecuador, nos conocimos en la ultima conferencia de Xamarin en Orlando.
I was gathering Xamirin information since last week and Glad to find your blog. Thanks a lot
Great stuff Charlin! The Xamarin folks should hire you to write documentation. The way you present information is top notch. Bravo!
Very good! Help me a lot!